Showing posts with label SAPUI5. Show all posts

Thursday, 16 June 2022

SAP ABAP - Add Custom Report to Fiori Launchpad

 Add Custom Report to Fiori

Create Semantic Object


  Open Fiori Builder


Create Catalog and Group from fiori Builder

a.      Create Catalog


 - Create tile


 - Create Target mapping


b.      Create Group


    Create Role and assign fiori group and catalog

    Open transaction PFCG


    Select tab menu


And run fiori app in web browser


Sunday, 2 December 2018

Create Dynamic SAPUI5 Tiles With JSON

Postingan kali ini saya akan sharing cara membuat menu tiles di SAPUI5 secara dinamis dengan menggunakan json, ok langsung saja kita buat project baru di eclipse jika belum tau cara membuat project baru sapui5 bisa dilihat DISINI

1. New Project


 2. Project Name


 3. Create View -> javascript


4. Setelah klik tombol finish diatas maka akan langsung ter-create structure project sapui5 seperti berikut :index.view, index.controller dan index.html


 sekarang kita tambahkah folder baru didalam folder WebContent dengan nama asset dan didalam folder asset kita buat dua buah folder dengan nama json dan icon


lalu tambahkan file type json didalam folder json dengan nama tile.json dengan cara klik kanan di folder json dan pilih New->file lalu tuliskan nama file dan extensinya (tile.json) lalu finish, dan didalam folder icon tambah 2 buah gambar dengan nama 1.png dan 2.png (nama gambar gak harus sama :D)


untuk iconnya saya menggunakan gambar dibawah ini :


setelah menambah file json dan icon, kita buka file index.html lalu ubah source code nya seperti berikut :


<!DOCTYPE HTML>
<html>
 <head>
  <meta http-equiv="X-UA-Compatible" content="IE=edge">
  <meta http-equiv='Content-Type' content='text/html;charset=UTF-8'/>

  <script src="resources/sap-ui-core.js"
    id="sap-ui-bootstrap"
    data-sap-ui-libs="sap.m, sap.suite.ui.commons, sap.ui.commons"
    data-sap-ui-theme="sap_bluecrystal">
  </script>
  <!-- only load the mobile lib "sap.m" and the "sap_bluecrystal" theme -->
  
  <style type="text/css">
   element.style {
       overflow-x: hidden;
       overflow-y: auto;
       background-color: #008b8b;
   }
   
   .sapMPage>section {
       position: absolute;
       top: 0;
       left: 0;
       right: 0;
       bottom: 0;
       background-color: darkcyan;
   }

   .sapMGT {
       display: inline-block;
       overflow: hidden;
       background: #dddddd;
       border-radius: 0.25rem;
       position: relative;
       box-sizing: border-box;
       border: 1px transparent dotted;
       outline: none;
       margin: 5px;
   }
   
   .sapMPanelHdr {
       font-weight: normal;
       font-size: 1.5rem;
       font-family: Arial,Helvetica,sans-serif;
       text-shadow: 0 0.0625rem 0 #ffffff;
       color: #fbf6f6;
       background-color: transparent;
   }

  </style>
  
  <script>
    sap.ui.localResources("ui5_tile");
    var app = new sap.m.App({initialPage:"idindex1"});
    var page = sap.ui.view({id:"idindex1", viewName:"ui5_tile.index", type:sap.ui.core.mvc.ViewType.JS});
    app.addPage(page);
    app.placeAt("content");
  </script>

 </head>
 <body class="sapUiBody" role="application">
  <div id="content"></div>
 </body>
</html>

buka index.view.js dan ganti bagian title menjadi seperit berikut :


sap.ui.jsview("ui5_tile.index", {

 /** Specifies the Controller belonging to this View. 
 * In the case that it is not implemented, or that "null" is returned, this View does not have a Controller.
 * @memberOf ui5_tile.index
 */ 
 getControllerName : function() {
  return "ui5_tile.index";
 },

 /** Is initially called once after the Controller has been instantiated. It is the place where the UI is constructed. 
 * Since the Controller is given to this method, its event handlers can be attached right away. 
 * @memberOf ui5_tile.index
 */ 
 createContent : function(oController) {  
  
   return new sap.m.Page({
   title: "SAPUI5 TILES WITH JSON",
   content: [panelContainer
   
   ]
  });
 }

});

Save lalu jalankan dan lihat hasilnya di browser, cara menjalankannya klik kanan pada file index.html 


maka akan muncul satu tab baru di eclipsi seperti berikut :


untuk membuka di browser klik yang diberi tanda merah dan hasilnya di browser seperti berikut :


selanjutnya buka file tile.json yang ada di folder asset/json/tile.json dan masukkan file json berikut :

{
  "Tiles": [
    {
      "ContentPanel": [
        {
          "frameTypeGnt": "OneByOne",
          "headerGnt": "Purchase Requisition",
          "iconGnt": "asset/icon/1.png",
          "pressGnt": "",
          "sizeGnt": "M",
          "stateGnt": "Loaded",
          "subHeaderGnt": "Create Purchase Requisition"
        },
        {
          "frameTypeGnt": "OneByOne",
          "headerGnt": "Purchase Order",
          "iconGnt": "asset/icon/2.png",
          "pressGnt": "",
          "sizeGnt": "M",
          "stateGnt": "Loaded",
          "subHeaderGnt": "Create Purchase Order"
        },
        {
          "frameTypeGnt": "OneByOne",
          "headerGnt": "Material Stock",
          "iconGnt": "asset/icon/1.png",
          "pressGnt": "",
          "sizeGnt": "M",
          "stateGnt": "Loaded",
          "subHeaderGnt": "Display Material Stock"
        },
        {
          "frameTypeGnt": "OneByOne",
          "headerGnt": "Process Order",
          "iconGnt": "asset/icon/2.png",
          "idGenericTile": 1,
          "pressGnt": "",
          "sizeGnt": "M",
          "stateGnt": "Loaded",
          "subHeaderGnt": "Create Process Order"
        },
        {
          "frameTypeGnt": "OneByOne",
          "headerGnt": "Confirm Order",
          "iconGnt": "asset/icon/1.png",
          "idGenericTile": 1,
          "pressGnt": "",
          "sizeGnt": "M",
          "stateGnt": "Loaded",
          "subHeaderGnt": "Confirm Process Order"
        }
      ],
      "headerTextPnl": "TRANSACTION",
      "idPanel": 1
    },
    {
     "ContentPanel": [
     {
          "frameTypeGnt": "OneByOne",
          "headerGnt": "Report1",
          "iconGnt": "asset/icon/1.png",
          "pressGnt": "",
          "sizeGnt": "M",
          "stateGnt": "Loaded",
          "subHeaderGnt": "Report1"
        },
        {
          "frameTypeGnt": "OneByOne",
          "headerGnt": "Report2",
          "iconGnt": "asset/icon/2.png",
          "idGenericTile": 1,
          "pressGnt": "",
          "sizeGnt": "M",
          "stateGnt": "Loaded",
          "subHeaderGnt": "Report2"
        },
        {
          "frameTypeGnt": "OneByOne",
          "headerGnt": "Report3",
          "iconGnt": "asset/icon/1.png",
          "idGenericTile": 1,
          "pressGnt": "",
          "sizeGnt": "M",
          "stateGnt": "Loaded",
          "subHeaderGnt": "Report3"
        }
     ],
     "headerTextPnl": "REPORTS",
       "idPanel": 2
    }
  ] 
}


kemudian buka file index.view.js lagi dan tambahkan source code seperti berikut :


sap.ui.jsview("ui5_tile.index", {

 /** Specifies the Controller belonging to this View. 
 * In the case that it is not implemented, or that "null" is returned, this View does not have a Controller.
 * @memberOf ui5_tile.index
 */ 
 getControllerName : function() {
  return "ui5_tile.index";
 },

 /** Is initially called once after the Controller has been instantiated. It is the place where the UI is constructed. 
 * Since the Controller is given to this method, its event handlers can be attached right away. 
 * @memberOf ui5_tile.index
 */ 
 createContent : function(oController) {
  
  //Image Component
  var image = new sap.ui.commons.Image({
   src:"{iconGnt}",
   width:"60px",
      height:"60px"
  })
  
  //Tiles
  var myTiles = new sap.suite.ui.commons.GenericTile({
   header:"{headerGnt}",
            subheader:"{subHeaderGnt}",
            size:"{sizeGnt}",
            frameType:"{frameTypeGnt}",
            headerImage:"{headerImageGnt}",
            state:"{stateGnt}",
            imageDescription: "{pressGnt}",
   tileContent:new sap.suite.ui.commons.TileContent({
          content:[image]
         }),
            
//            press: oController.eventTile2
  })
  
  //Panel to display tiles
  var myPanel = new sap.m.Panel({
   headerText : "{headerTextPnl}",
   backgroundDesign : "Transparent",
   content : {
     path : "ContentPanel",
     template : myTiles, 
     templateShareable:true
   }
  })
  
  //panel to display myPanel
  var panelContainer=new sap.m.Panel({
   backgroundDesign : "Transparent"
  });
  
  //Bind JSON to Panel
  panelContainer.bindAggregation("content", "/Tiles", myPanel);
  
   return new sap.m.Page({
   title: "SAPUI5 TILES WITH JSON",
   content: [panelContainer
   
   ]
  });
 }

});

dan tambahkan source code berikut didalam file index.controller.js


onInit: function() {
  var oModel = new sap.ui.model.json.JSONModel();
  oModel.loadData("asset/json/tile.json"); //load json file
  sap.ui.getCore().setModel(oModel);
 },

dan silahkan refresh kembali aplikasinya didalam browser jika berhasil makan tampilannya akan seperti berikut :


sekian sharing kali ini semoga bermanfaat terimakasih :D

Friday, 14 September 2018

Firebase SAPUI5 - Simple Real Time Application

Halo...
pada postingan ini saya akan sharing membuat aplikasi real time sederhana dengan sapui5 dan firebase. sebelum mulai, bagi teman-teman yang belum tau apa itu firebase mungkin bisa dibaca-baca dulu diblog2 yang membahas firebase dan bagaimana cara mendaftar akun firebase dan cara membuat database firebase karena di postingan ini saya tidak menjelaskan itu dan hanya fokus pada pembuatan aplikasi real time sederhana sapui5 dan firebase.

ok langsung saja kita mulai, pertama kita masuk dulu ke firebase console dan kita buat project baru, dan kebetulan saya sudah membuat project dengan nama EXAM setelah itu masuk ke project EXAM dan atur rules dengan mengikuti step-step seperti berikut :


rubah menjadi true write and read


setelah itu klik bagian yang ditandai kotak merah diatas kemudian copy source berikut dan kita masukkan kedalam project ui5.


kemudian kita buka eclipse dan buat project baru sapui5, jika belum tau cara membuat project baru di sapui5 bisa dilihat DISINI , kita buat project baru dengan nama ui5FIrebase untuk default view kita buat dengan nama index, kemuadian buka file index.html lalu rubah source code nya menjadi seperti berikut :


buat folder baru dengan nama asset didalam WebContent dangan tambahkan file baru dengan nama frbs.js dan tambahkan source code berikut :


kemudian buka file index.view.js dan tambahkan source code berikut :

var label1 = new sap.m.Label({
text : 'Name'
})
var label2 = new sap.m.Label({
text : 'Email'
})
var label3 = new sap.m.Label({
text : 'Address'
})
var txtNama = new sap.m.Input({
id:'txtName',
showValueHelp:true
})
var txtEmail = new sap.m.Input({
id:'txtEmail'
})
var txtUrl = new sap.m.Input({
id:'txtImgURl'
})
var btnSave = new sap.m.Button({
text:'Save',
icon:'sap-icon://save',
press:function(){
if(action == "Add"){
oController.onAddData();
}else if(action == "Edit"){
press:oController.onEditData();
}
}
})
var btnEdit = new sap.m.Button({
text:'Edit',
icon:'sap-icon://edit',
press:function(){
action = 'Edit';
oController.onOpenDialog(action);
}
})
var btnHapus = new sap.m.Button({
text:'Delete',
icon:'sap-icon://delete',
press:oController.onDeleteData
})
var btnDialog = new sap.m.Button({
text:'Add',
icon:'sap-icon://add-document',
press:function(){
action = 'Add';
oController.onOpenDialog(action);
}
})
var btnCloseDialog = new sap.m.Button({
text:'Cancel',
icon:'sap-icon://close',
press:function(){
oController.onCloseDialog();
}
})
var oTableUI = new sap.ui.table.Table("uiTable",{
selectionMode : sap.ui.table.SelectionMode.Single,
navigationMode: sap.ui.table.NavigationMode.Scrollbar,
selectionBehavior: sap.ui.table.SelectionBehavior.Row,
alternateRowColors:true,
enableColumnReordering:true,
enableCellFilter:true,
visibleRowCount:8
})

oTableUI.addColumn(new sap.ui.table.Column({
    label: new sap.ui.commons.Label({text: "User ID"}),
    template: new sap.ui.commons.TextField().bindProperty("value", "userid") 
  }));
oTableUI.addColumn(new sap.ui.table.Column({
    label: new sap.ui.commons.Label({text: "Name"}),
    template: new sap.ui.commons.TextField().bindProperty("value", "username") 
  }));

oTableUI.addColumn(new sap.ui.table.Column({
    label: new sap.ui.commons.Label({text: "Email"}),
    template: new sap.ui.commons.TextField().bindProperty("value", "email")
  }));

oTableUI.addColumn(new sap.ui.table.Column({
    label: new sap.ui.commons.Label({text: "Address"}),
    template: new sap.ui.commons.TextField().bindProperty("value", "address")
  })); 
oTableUI.attachRowSelectionChange(function(oEvent) { 
oController.onTableKlik(oEvent);
})
var oDialog = new sap.ui.commons.Dialog("oDialog",{
title: "Add New Data",
width: "500px",
height: "400px",  
resizable: true,
modal:true,
showCloseButton:false
});
var oPanel = new sap.m.Panel("oPanel",{
content:[label1,txtNama,label2,txtEmail,label3,txtUrl,btnSave,btnCloseDialog]
})
  return new sap.m.Page({
title: "CRUD SAPUI5 Firebase",
content: [btnDialog, btnEdit, btnHapus, oTableUI
]
});

dan tambahkan source berikut didalam index.controller.js

onInit: function() {
var oModel = new sap.ui.model.json.JSONModel();
var oTable = sap.ui.getCore().byId("uiTable");
database.ref('users').on('value', function(snapshot) {
dtJS = [];
oModel.refresh();
snapshot.forEach(function(childSnapshot) {
  items = {};
  items.userid   = childSnapshot.key;
  items.username = childSnapshot.val().username;
      items.email    = childSnapshot.val().email;
      items.address  = childSnapshot.val().address;
      dtJS.push(items);
      console.log(childSnapshot.key);
    });
oModel.setData(dtJS)
oTable.setModel(oModel);
    oTable.bindRows("/");
});
},
onAddData: function(){
if(key == 0){
key = 1;
}
var name = sap.ui.getCore().byId("txtName");
var email = sap.ui.getCore().byId("txtEmail");
var pic = sap.ui.getCore().byId("txtImgURl");
var dialog = sap.ui.getCore().byId("oDialog");
database.ref('users/' + key).set({
username: name.getValue(),
email   : email.getValue(),
address : pic.getValue()
});
name.setValue("");
email.setValue("");
pic.setValue("");
dialog.close();
},
onEditData: function(){
if(selectedKey == null){
alert("No Data Selected");
}else{
var name = sap.ui.getCore().byId("txtName");
var email = sap.ui.getCore().byId("txtEmail");
var pic = sap.ui.getCore().byId("txtImgURl");
var dialog = sap.ui.getCore().byId("oDialog");
database.ref('users/' + selectedKey).update({
username: name.getValue(),
email   : email.getValue(),
address : pic.getValue()
});
dialog.close();
}
selectedKey = null;
name.setValue("");
email.setValue("");
pic.setValue("");
},
onDeleteData: function(){
if(selectedKey == null){
alert("No Data Selected");
}else{
database.ref('users/' + selectedKey).remove();
}
var name = sap.ui.getCore().byId("txtName");
var email = sap.ui.getCore().byId("txtEmail");
var pic = sap.ui.getCore().byId("txtImgURl");
name.setValue("");
email.setValue("");
pic.setValue("");
selectedKey = null;
},
onTableKlik: function(oEvent){
var oTable = sap.ui.getCore().byId("uiTable");
var idx = oTable.getSelectedIndex()
if (oTable.isIndexSelected(idx)) {
var cxt = oTable.getContextByIndex(idx);
        var path = cxt.sPath;
        var obj = oTable.getModel().getProperty(path);
        
        selectedKey = obj.userid;
        
        var name = sap.ui.getCore().byId("txtName");
var email = sap.ui.getCore().byId("txtEmail");
var pic = sap.ui.getCore().byId("txtImgURl");
name.setValue(obj.username);
email.setValue(obj.email);
pic.setValue(obj.address);
}
},
onOpenDialog: function(action){
var dialog = sap.ui.getCore().byId("oDialog");
var panel = sap.ui.getCore().byId("oPanel");
var name = sap.ui.getCore().byId("txtName");
var email = sap.ui.getCore().byId("txtEmail");
var pic = sap.ui.getCore().byId("txtImgURl");
if(action == "Add"){
dialog.addContent(panel);
dialog.open();
}else if(action == "Edit"){
if(selectedKey == null){
alert("No Data Selected");
}else{
var oTable = sap.ui.getCore().byId("uiTable");
var idx = oTable.getSelectedIndex()
if (oTable.isIndexSelected(idx)) {
var cxt = oTable.getContextByIndex(idx);
        var path = cxt.sPath;
        var obj = oTable.getModel().getProperty(path);
        
        selectedKey = obj.userid;
       
name.setValue(obj.username);
email.setValue(obj.email);
pic.setValue(obj.address);
dialog.addContent(panel);
dialog.open();
}
}
}
},
onCloseDialog: function(){
var dialog = sap.ui.getCore().byId("oDialog");
dialog.close();
selectedKey = null;
}

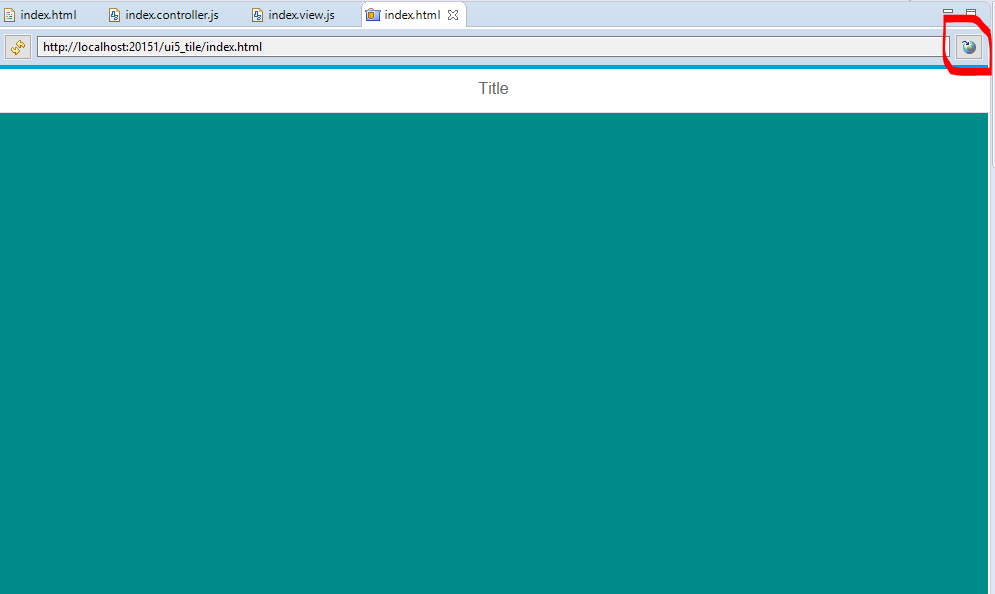
sekarang coba jalankan aplikasi dan semoga bermanfaat
terimakasih :D

Belajar SAP ABAP RAP

  Belajar SAP ABAP RAP: Pengenalan dan Konsep Dasar Restful ABAP Programming Model Kalau kamu seorang ABAPer yang mulai terjun ke dunia SAP...